Oh Snap! Holidaz - Holiday lights!!

I've been running around the last few nights shooting Holiday lights.  I've been perfecting my version of David Hobby's blog post on shooting lights.  How did I do?


While scouting other opportunities to add to my collection I ran into a couple houses I couldn't wait for good light to shoot - they were just too tempting.  As a result, I decided to launch my first annual "Griswald-Hall" contest.  The rules are simple, the most enthusiastist decorations win.  And you get to choose the winner!

First place goes to the entry that comes closest to Clark Griswald and Buddy Hall's triumphs (personally, I'm glad I don't have to vote on which of those 2 would win!).

So here we go, our first 3 candidates (hey, it's all I've found so far!):

Candidate #1

Candidate #2

Candidate #3

So help me pick a winner, add a comment and pick your favorite, or email me directly (I'd rather you leave a comment below, so I ain't gonna give you my email here if you don't already have it - I'm a a stinker!)

Let the voting begin!!!

Oh Snap! Frolicking in the Park

A cool morning, no wind and cloudy skies met us on our morning walk. So, off to the park to play some ball....

 Eyes on the ball Journey!

There you go, that's the ticket!

Uh, um... you don't wanna go up when it's coming down...

Or you'll be coming down when it's going back up!

See the ball, BE the ball... WATCH THE BALL!!!!

 See Skittles? She's got the idea!!

You got it!!!!  Now bring it here!

Not there, HERE!!!!!


If he drops it, 'cn I have it?!

S'all cool Dude, I got this!

I'm thinking...  Lunch! Who's in?!

Hope you enjoy...

Oh Snap! Over the top

Quick vote - let me know if you like or don't like these images?!

I hate when this happens - last night I was reviewing a cool set of photos that deliberately over-exposed images of structures, etc.  It was the inspiration for the pictures below.  Over-exposing is nothing new, but when something inspires me I'd like to be able to give them proper credit.  Once again I have to apologize to the Unknown Photog.

Over exposing means pushing the dynamic range and ending up with black-n-white images which look very much like pencil drawings.  To do that, however, you have to have a bright whites and strong shadows to start with...

Skittles, Journey and I headed off for our walk (what else is new), and returned to Windsor Lake with the over-exposure idea in mind.  First thing we run into is the park bench (1st shot).  After that, I just shot whatever tickled my fancy.

Each image was 2-3 stops over-exposed, then pushed further in Lightroom.

Again, am interested in hearing what you think!

Bench by the lake

Winter Tree

Overhang
(yes Virginia, I shot daylight balanced, and yet the shadows turned blue!)

Lone Tree by the Lake

Even Bigger Overhang

Somehow these feel old-school, old-tech to me. I kind of like them, actually.

Of course! I wouldn't have posed them otherwise... :)

Hope you enjoyed...

TTV Shoot

I just finished attending  a 2-day live-stream workshop of Jeremy Cowart via CreativeLive.  The topic was experimental photography - trying new ideas and keeping your photography fresh.  Great workshop, Jeremy showed us a lot of great ideas, and some neat tricks.  The one I'm playing with in this blog is shoot your subject through the viewfinder of an old, vintage camera.

The best cameras seem to be those with larger viewfinders (remember the old Rolleiflex box camera?), but Jeremy's first set with this trick seemed to be a very small camera with a small viewfinder.  He created some really cool images with this setup.  During today's session, he also used a camera more like the Rolleiflex mentioned above.

I liked the idea so much I thought I'd try it.  It just so happens I have one of my Dad's old cameras - a Graflex Custom Graphic medium format camera.  I remember many unhappy times as a child, waiting while Dad fiddled with settings, loaded film cartridges, tweaked my posture, my position, and grumbled over my frown or frozen smile.  Now, when I look at it I just grin, but back then... JEEZ....

For this post I wanted to include a shot of the my Dad's camera.  So, in keeping with the experimental nature of Jeremy's workshop, I played with hand-painting the camera against a medium gray seamless.  First, I painted the camera with a straight tungsten flashlight with a black cinefoil snoot.  I then followed up by painting the area around the camera with a blue gel on the same flashlight.  This was my result, after merging a few select layers in Photoshop:

(ok, it needs a little work - but hey, it's my first time!)

For the shoot, I set Dad's camera on one tripod, and posed Tammie in front of an east facing window with the blinds down.  I hung some filmy black material over the blinds to create some texture to give it a better look.  I used my Hoodman loup to check focus on the back glass of the Graflex, and then scan the whole frame to ensure I had things set as I wanted.  I had a touch of nostalgia, imagining myself doing this back in the 50's when this kind of thing was commonplace.

Next, I set up a strobe with an 11" reflector, set it up high and aimed down at Tammie's face.  Using just the modelling light, I set the camera's white balance to 2800 Kelvin.  Here's what I got:


One of the cool things about my Dad's old camera is the tilt-shift capability of the lens.  I took advantage of that when I set up this shot.  I angled the lens away from Tammie's face so her left eye was even more blurred than the wide open aperture was giving me.  As you can see, even her nose is also significantly blurred, and just her right eye is in sharp focus. 

Something you'd want to do with a live model?  Maybe not, but as a first attempt I think it looks quite cool!

Notice also, the daylight streaming through the window behind her turns a nice blue when I set the white balance to match the tungsten modeling light I was using.  Nice!!!

Here's a pull-back shot, which I also like quite a bit as well...


Kinda cool, yes?

An interesting trick/technique, which I'll be exploring further.  There's dirt and spots on the back glass as well as the lens, and I think that adds to the effect so I'm not planning on cleaning it as long as I'm using it this way.


Hope you enjoyed...

You never write..

I've been a little lax in my blogging, but as much with my shooting... Sorry...

This past Saturday my dogs and I went for a walk around Windsor Lake.  I took my camera as usual, but for some reason I decided to mount my 100-400mm zoom.  I usually take my 24-105mm for more versatility, but something made me switch.  And I'm glad I did. The first half of the walk I thought I wouldn't get a chance to use it though.

All that changed on the south side of the lake.  All the geese were hanging out there and I managed to get one interesting shot - I'd never seen them line up like this before:


But of course, they only showed me their butts.  That seems to be all I ever get from geese.  Long before I get in range they're moving away.  And you can forget sitting and waiting for them to ignore me - the dogs keep moving around and scaring them off.  However, I thought this marching (paddling?) line was interesting enough to capture...

All those birds and all I can get are the back sides. (sigh) So we move on.  Nothing else of interest, we get back to the car and load up.  I'm pulling away, look over at the other small lake on the west side of the road and freak out when I see this guy:


This is a major crop from the original image shot.  This guy is on the far side of the lake, and he's just a small part of the whole image.  I left the dogs in the truck and walked the path that wound around the lake to see if I could get closer. No such luck.

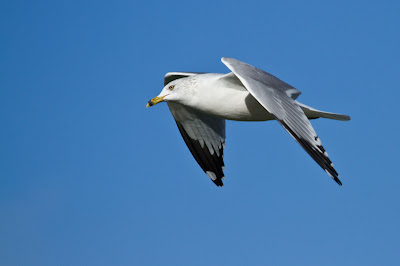
But, there were some gulls that gave me some good shots:


This last shot was taken after I'd come back around to the east end of the lake and hunkered down in the grass at the water's edge.  I caught him out of the corner of my eye while watching the eagle, and quick-snapped this image.  Even though his wing is cut in the image, I still like this shot!

My hands are starting to get really cold and stiff, and I'm ready to pack it in when a shadow cuts across the ground directly in front of me:


This guy never came down, and never got any closer than the other eagles.  This, however, isn't as drastic a crop as I liked the scale of him against the clouds... It's a cool effect: when they're circling as he was, they give you an almost perfect profile, and it gives the illusion that you're up in the sky with her.

(I know,  I know - I referred to the bird as "him" at first, but I'm an equal opportunity sex-guesser! So, there you go).


Hope you enjoyed...

Sketch shots: Tilt-Shift

In the old days, camera's consisted of lenses mounted separately and connected to the main body with bellows.  This allowed the lens to be shifted up or down, left or right and tilted along the same axes.  This feature created some rather awesome possibilities for your photography.

You can still buy "field" camera's that do the same thing, but they are not nearly as prevalent as the cameras of today where the lens is hard-mounted to the body.  Enter the tilt-shift lens.  If you've got the money, you can buy tilt/shift lenses in different focal lengths, such as this 90mm Canon lens.

If you have the money...
Or can justify the purchase - if your wife will let you...

Or, you could buy one of the Lensbaby devices (this will win over your wife if you first show her the lens option)

I'm gonna do what photogs have been doing before there were tilt-shift lenses or Lensbaby's - I'm going to detach my lens and hold it in front of the camera body while I'm shooting.

WHAT?!?!

Yep, something I picked up this morning.  I was doing my usual morning surfing and ran into a cool shot using that technique.  That's REAL old school!

I got so excited by the idea I grabbed a camera, did a real quick natural light setup and shot Teddy.  (so quick I've lost the original web page that I got this idea from. Respect to whoever that was - my apologies for losing you)

Canon 20D, 85mm F1.2 lens @ F/1.2


Now, the first thing one realizes when making a shot this way - there's no control of the aperture.  You're shooting wide open cause you can't close it down when it's off the body.  Make sense?  So, for consistency I shot all images of Teddy wide open so I wouldn't have to worry about changing settings when I took the lens off.

Other factors are also at play - first, there's lens-to-sensor distance.  The shot above was taken from roughly 3 feet away.  That's as close as I can get and still achieve sharp focus with the 85mm when it's mounted normally.  You can buy extension tubes, which allow you to get closer, even into the macro realm.  But these tubes maintain the parallel relationship of the lens to the film sensor.  You can't tilt  the lens to a different angle for additional effects.

But you can with a LensBaby or holding the lens by hand.  And since I'm strapped at the moment, I'm going with the latter. 

This is what I got!
See how close I can get just by extending the distance between the lens and sensor?
I'm only about 10" away!

Both images are as shot, with minor contrast and tone curve adjustments in Lightroom.  No cropping or clarity/sharpness tricks were used.

Pretty snappy, huh?!?!

There is something to take into account though - camera shake.  Instead of just having to just stabilize your camera, you now have to stabilize it AND the lens while maintaining distance and orientation.  Doing this hand-held, as I did, can be shaky (pun intended).  It took several attempts to get a good result.  I set my elbows on the table, pressed the camera's viewfinder into my forehead, and got a strong grip on the camera with my right hand.  Resting the camera against the palm of my left hand helped stabilize it and the lens, and maintain the spacing. That leaves it to the fingers and thumb to hold the lens at the desired position. 

Once I got the hang of it, it worked pretty good! And it was cool to shift the lens around and see the results. However, one final note - be careful how far you space the lens away from the body - too far and you'll get haze on your image from light sneaking through the gap.

I could have tried to do this with a tripod, but I don't have a means to extend mine out over the table I was shooting from. I didn't want to pull Teddy over to the edge, I would have lost the bounced light from the white surface he was standing on.  In the end, patience and a little trial and error gave me a great shot.

There's a certain sense of security when you're free-holding your expensive lens a few inches from the table top, but what am I gonna do when I shoot a 5'10" model?!  hmmmm.....


Hope you enjoyed...

Sketch shots: Channeling Zack Arias

If you're a photog and haven't heard of Zack Arias yet, then get busy, get caught up and then get a feed for his blog.  You won't regret it.

My first taste of Zack came when I attended his 3-day weekend workshop on CreativeLive where he covered studio photography, and the do's and don'ts of running your own business.  Lots of great ideas came out of that workshop.

His latest offering comes in the form of his new "OneLight Field Guide", a companion to his Onelight DVD and associated weekend workshops.  While I can't attend his workshops, I did pick up a copy of his field guide.

It's exactly what it says it is - a field guide.  He starts with a list of lights & modifiers that he typically takes on location shoots, and follows up with page after page of images he's shot, an accompanying diagram of equipment used and where it was placed, along with the camera settings required to create the shot.

However, it's not really a newbie's guide in that he doesn't walk you through an introduction to lighting.  It's a field guide after all, and as such it's short and to the point.  If you're an Over-Analytical (O-A) type, but don't have a  reasonable grasp of lighting concepts, the guide might be best read in conjunction with his DVD, or after attending one of his workshops.

Since I am an O-A, and A-R to boot (chew on that one for awhile!), I decided I'd try to duplicate some of his results to make see if I could create the same effect with my equipment.  For me, that first step of recreating helps me get a firm grasp of another's concepts.  From there I can merge and incorporate it with my own style.

So, here's some of my results.  Oh, and if you already have his field guide, note that Tammie has been with me a couple years now, so this is one concept I've already been practicing! (this will make sense when you read his guide)

I call this series "The many moods of Tammie"...

(all images are as shot, with only minor tweaks in Lightroom, except where noted)

One Light, large open umbrella

The large umbrella creates a nice, soft light that wraps around Tammie.  Where Zack shot against a white background, I shot against black.  However, by feathering the light so some hit the background behind her, and placing her closer to it, I achieve roughly the same effect.  Notice how she separates from the background. 


One light, large half-closed umbrella

Without moving the umbrella, simply closing it down and channeling the light tighter, you get a more dramatic look.  The darker mood is enhanced by the lack of a catch light (impossible to get on a mannequin) in her eyes.  Some may not like this look, but I'm intrigued by it.  Notice how it looks like now she's almost blowing a kiss now?

Adjust the exposure in the camera a bit and zoom in tight on the eyes, and you get another mood from the exact same setup:

(No, those aren't actual catch lights in her eyes, they're painted dots, from the factory.  Apparently mannequins with dead eyes don't sell clothes well.)

Back to an open umbrella, and toss in a gridded rim on the other side...


And she pops nicely out of the background while keeping the effect subtle.


Now, something I've only recently been playing with - the idea of moving the main light to more oblique angles...
Strobe with 7" reflector & 20 deg. grid

I placed a 2nd strobe to the side and just slightly behind Tammie, dialed up to create my main light.  I kept the  large umbrella where it was, and dialed it down till it just barely kissed her face and brought out her eye.  To do this I had to feather it so most of the light fell on the background.

Why isn't the background showing up lighter? Inverse Square Law!!!  If you don't believe me, read Zack's guide - he mentions it 7 different times in his book.  Yes, it's that important...

Ok, last shot - turn off the umbrella light, relocate the gridded one and adjust the power...

(shot in tight, then pulled into Photoshop to extend the canvas to create the effect)

Quite a bit of mystery here...

Ok, so there you have my Zack Arias impression, with maybe a touch of me mixed in here and there.  As David DuChemin puts it, these are all sketch photos - test shots of lighting concepts. 
Some of them I think I've got dialed in very nicely, some I still want to work on.  But they're still sketch shots till I get a chance to use these techniques on a live subject.


Hope you enjoyed...

A fairy tale

Or just a tale I'm trying to tell...

Know what it is?


Enjoy...

An Organic experiment

(Thankfully blog editing doesn't include my iPhone's auto-correct feature!)

The experiment revolves around some interesting leaves I found in the back yard during a doggie potty run. I won't give you much in the way of setup, but am asking you to look, react, and send me your impressions.

I tried a couple new ideas, and out of all the shots I selected 5 images to play with. Some images I really like, the others intrique me but also bother me. I won't taint your review by saying anything else.

I could use the help of getting your reactions to these images. No response is wrong - you don't have to be an art critic or photographer to reply. I'd actually prefer a laymen's point of view. If an image bugs you and you don't know why, that's good enough response - just let me know which images you like and which ones bug you. However, if you have an idea of what does bother you, or can articulate what you'd like to see changed, I would appreciate that feedback too!

Here we go:

Image #1


Image #2


Image #3


Image #4


Image #5


Thanks in advance for helping me with this!

Enjoy...

My first rant!!!

And rant I shall! I'm frustrated with Manfrotto and Denver Pro Photo over a broken Ellinchrom BX500RI. Well, the light works, but the swivel that mounts it to a light stand is broken. No, I'm not really mad at Elinchrom, product defects happen. That doesn't bother me - crappy service when trying to repair such things does.


 Notice the crack at the bottom of the thumb screw base

Let me sum up - no - let me es'plain...

 
Back at the beginning of September I was doing yet another shoot with my dogs Journey, Skittles and Stuffy (right to left). I hung a Lastolite 24" square E-Z Box on the light, hung the rig on a boom to use as overhead light. The light kept sagging, and I couldn't seem to tighten it enough to hold it in place.

Now, in my defense, I'm not a cranker - one of those types that cranks a screw to the breaking point just because I can (and sadly, I couldn't even if I wanted to). I typically tighten slowly till the light hangs where I want without sagging. However, this time I couldn't get it to stay, and discovered the crack you see above when I examined things closer.

So, I went in search of a replacement part...

In the U.S., Elinchrom is distributed by Manfrotto. So, I sent an email requesting help to their sales department (I couldn't find a support/repair contact). Mailed on the 8th of September, I get a reply 2 weeks later on the 24th. Frank Giokas tells me to contact parts and gives me phone and email address info.

However, by that time I'd given up on them and contacted Denver Pro Photo (DPP), where I originally purchased the lights. Turns out they are the Colorado service provider for Manfrotto and hence, Elinchrom. I drove down, met with a sales person who helped me fill out a repair request form. I left the part with them and returned home in high hopes of a reasonable, timely response.

A month and a half later I got tired of waiting and called DPP to find out what's up. Travis takes care of service for DPP, and he informed me that Elinchrom (and by extension Manfrotto I assume) are aware of a quality control problem resulting in the crack I experienced. He tells me this is a warranty issue, that Elinchrom is getting replacement parts sent to the U.S., and he expects news and maybe even a part for me within a couple days.

I voiced my frustration with not having been informed. In my career at Hewlett Packard I've managed customer support services for the internal divisions (my customers were other HP-ites). Keeping a customer informed and in the loop was a critical component of successful customer service. Your customer will be a lot more patient and understanding if they know what's going on.

Apparently that's not a policy for DPP. As I write this, it's now just over 3 months and I STILL haven't received a replacement part, nor heard from anybody. Travis hasn't bothered to contact me after assuring me he'd do better at keeping me in the loop.

If you promise a customer that they should be hearing from you within a couple days, THEN CONTACT THEM WITHIN A COUPLE DAYS! Not a hard concept in my mind.


Just how long does it take to replace a stupid part anyway?!

I'm Ready Mr. DeMill!

Ready for my closeups!   (only the oldies will likely recognize this line!)

Last night I played around with an idea I've been tossing around in my head. I decided it was time to see if it would work.  Here's the first teaser...


Some time ago a good friend gave me a shoebox full of seashells she'd collected over time. There were some interesting shapes in the box, but I never really came up with a conventional way to shoot them that I liked, so they ended up sitting on a shelf. Some time later I came up with an idea that I thought would be cool, but it required a bit of setup to accomplish. Unfortunately, one thing lead to another and it kept ending up on the back burner.

Yesterday I needed a fun little project to lift my spirits, and the fates rewarded me with a reminder that I still hadn't shot the seashells (right about now I'm humming a tune - what's the title?!). So, I got the materials together and set about finding out if my idea would work.

The shot above isn't it. That's a test shot using ambient light what went right. Yes, for those who notice, there is a touch of a rim light on the left underside of the shell - it's coming through the front door's side glass and under the banister railing to just kiss the shell.

Interesting enough shot, isn't it? But what if I move in closer and add a couple lights....

It's obvious I'm lighting the inside of the shell, but that alone didn't seem enough. I gelled a Canon 580 with a full cut of CTB (Color Temperature Blue for the non-photog readers) through a 30 degree grid to give it just a bit of kick.  Do you like?

How about this little guy?
Straight flash kicker skimmed across the top with a 30 deg. grid...

Anyone ever run across a seashell like this next shot?
 Straight flash kicker through a 1-stop tri-grip diffuser angled to feather across the "bug"

I wonder what used to live inside this little guy?
Bring the kicker down and camera right, and feather with the tri-grip again.

My 2 favorites:
 Straight Kicker back to camera left and diffused with the tri-grip.


Blue gelled kicker with the feather tri-grip diffuser yet again. It's a great combination.


Here's where I have a little fun - a challenge for you: how did I light the inside of these shells? I'll give you a hint: if you look close enough, you'll notice every shot is showing a double reflection...

Images were shot with my Canon 7D. Half were shot with my 24-70 f/2.8 lens, the closest thing I have to a macro lens, and the tighter closeups were done with my 70-200 F/2.8 and the Canon 500D close-up lens. The focus with this combination isn't as tack sharp as I'd like, but it's a great inexpensive solution when you can't afford a quality macro lens.

I used a Zack Arias trick I learned in his Creative Live weekend workshop to stretch the negative space in some of the images. I shot as tight on the seashell as I could, then expanded the canvas in Photoshop to get creative with final composition.The technique works easy-breezy when dealing with solid colors. But you do get interesting effects if your background has texture. Luckily I was working with solid black with these guys.

One thing I did learn that might be useful if you decide you want to try this: never place the subject right at the minimum distance that the lens can handle and still focus. Wherever you place your focus, 1/3rd of the depth of field is in front of that point, while the remaining 2/3rd's is behind it, yes? If you put the point of focus right at the minimum distance, that front 1/3rd is not available to you. You only get 2/3rds of your maximum possible depth of focus this way.

So, while it's real tempting to get in as tight as possible so you get as large an image as possible, if you're going for maximum dept of focus, back the subject up. This will let you get as much of the subject in focus as possible.

Unless, of course, you want it blurry!  


Hope you enjoy...