Oh Snap - Let Sleeping Dogs Lie

What do you do if you're a dog photographer without an assistant?  If you're shooting your own dogs, you settled for those moments when they're least likely to jump up and come sniff the lens.  Sure, my guys can sit and stay, and Skittles can even sit up on her hind legs, but come on, how many times can you shoot that? Here's Journey sitting in the living room, and the kitchen, and the back yard, in the dog park and by the lake.  And Skittles... .... ... well, you get the idea.

I saw Candy laying in the middle of my freshly vacuumed carpet (an almost daily activity - she sheds like crazy!) so I snuck over, grabbed my camera and 70-200 and started playing.  At first I stayed on the couch so the dogs would ignore me.  Leaning over the arm, I was able to get these:

(A butt shot?  WHAT was I thinking?!)


As long as he's focused on Candy I can catch some Z's!

Candy never seems to lay with her head toward me, so I got down on the ground and tried to get some interesting shots of her from a very low perspective.  For most of these I set the camera on the ground and tilted the lens with my hand to frame them:

Am I dreaming, or is there a nut on the ground with a camera pointed at me?
Candy has this inner lid that slides over her eyes when she sleeps.  As I clicked away, she opened one eye partway, leaving the inner lid covering her eye.  Almost a zombie look, huh?


OMG it's NOT a dream!  Wow, he looks silly when he's down this low...

All right, fine... But if you're gonna shoot, THIS is my best side.

There's something interesting about Candy's eyes - the more relaxed and laid back she is, the more they seem to recede under her eyelids, and the more the lower ones droop.  When she's actively engaged in something her eyes are larger and closer to the surface.  I can't think of a better way to explain it than that.  I think I need to try to do a series of photos on the many shapes of Candy's eyes...

For the techno-weenies, all shots were taken handheld at ISO 6400, between F/2.8-6.3 in ambient room light.  No processing was done to address ISO noise, and only basic exposure/contrast tweaks in Lightroom and Photoshop.

Hope you enjoyed...

Oh Snap! Shelter Dogs

If you've been following me for very long you know my two passions are photography and dogs.  Over the last few years I've spent time helping out Denkai Animal Sanctuary, and on my last visit I took along my Canon 5D with the 50mm f/1.2 lens.  As usual, I fell in love with everyone and wanted to take them all home with me.  I can't, but maybe some of you can.

These images are part of a project I'm working on, and aren't intended for their adoption site profiles.  I won't tell you about the project, but I would be curious about your reaction to these images.

You can view the entire on my Flickr site, but here's a few of my favorites:


Ramble, a long time resident at Denkai, has my heart most of all

A bundle of pure fun, loving energy

Just met these 2, they were a little shy but
enjoyed a scratch through the fence.

This little thing has more energy than I was ready for -
she scrambled out of my arms before I could stop her!

If you're in the Ft. Collins/Greeley area, go check out the Denkai Animal Sanctuary out on highway 392.  I'd bet a beer you'll fall in love with a dog, a cat, a few of them or (if you're like me) every single one of them.

Hope you enjoyed...

Channeling Grace Chon - and others...

I've been following and studying pet photographers for some time now.  In previous posts, I showed my efforts to learn from the work of masters such as Tim Fach, Andrew Zuckerman and Jill Greenberg.  These shooters were known for their use of flash in their work with animals, and I wanted to understand how they achieved their effects and see where I could take it from there.

A while back I discovered Grace Chon, a pet photographer in the L.A. area.  Grace is known for working with available light, and she has quite a unique style.  Her work is known for bright and cheerful imagery and, when not including the pet's owner, typically uses very short depth of field to create interestingly blurred backgrounds. 

Getting that bright and airy feel has been alluding me, but I think I'm beginning to get closer.  Here's a couple shots of one of my most favorite subjects, and one of a neighbor with an interesting reaction to passing dogs...

You know I don't make eye contact when you point that thing at me.  


Silly man, I'm looking at that rabbit hiding in the grass behind you!
I was thinking about Grace's work as we came upon this small patch of grass with good, open shade.  I thought we'd try letting the background blow out a little more than I usually do.  These images are basically straight out of the camera, except for some small tweaks in post for cropping, vibrance and saturation.  Oh, and a small tweak to improve contrast.

Not quite there yet, but I'm getting closer.  In the same vein, this next one is a shot of a neighbor's Airedale Terrier in full sunshine.  This guy gets excited when other dogs pass his yard, and his owner taught him to grab these stuffed balls and shake them rather than run along the fence and bark.  It doesn't always work, but when it does he puts on quite a show!


Shake that ball thing, shake that ball, oh yeah!!!

As with the flash shooters, it's not my intention to adopt Grace's style as my own. Rather, to understand it to the extend I can blend it with my own, which tends to go darker.  Some good examples are a couple images from a series I've started called "Behind The Fence":


Chomp "Bark!" chomp, slobber, chew, "Bark Bark!!"
Another neighbor's dog has a berm just behind the fence, running the length of it.  This morning, he happened to be chewing what looks like a rawhide bone.  He ran back and forth on the berm barking and staring at us, and at no time did he drop that thing!  It was really fun to watch!


Nothing to see here, move along fella!
This guy starts barking when you approach, but if you and your dogs stay calm and quiet (as my WONDERFULLY FANTASTIC puddies do!!!!) she settles down quickly and just watches you walk on.


Studying the style of shooters I admire isn't about mimicking their work so I can create images that look like theirs.  It's about expanding my toolbox of choices by taking components from what I learn and incorporating them into my own evolving style. I do that best by practicing their style till I've got it down, then I can determine which components best aid me in creating the kind of work I want to do.

Thanks Grace, for your inspiration...


Hope you enjoyed...

Prime Wars

I've had one of the early generation Canon 85mm F/1.2 lenses, and have used it a bit in some of my fashion/glamor work, but never with a wide open aperture.  Slow to auto focus, I never considered it for work that needed fast focusing capabilities.  Working with dogs definitely falls into that category - I thought.

I'm currently fostering a HUGE black lab (I think she has some horse in her, however) for surgery, which she goes in for tomorrow.  Yesterday I decided to play with and compare my 50mm F/1.2 to my 85mm and see how they compare to each other.  Following a suggestion I picked up along the way, I chose to only shoot at F/1.8, and here's the results:

85mm  @ F/1.8
Here we go again - take the picture, this IS me smiling
This is the only picture I could get of Skittles. All the outdoor shots have either Journey's butt or Candy's nose poking in at just the right time.  I love how fast the Depth Of Field (DOF) falls off here.  It just takes your eyes right to Skittles beautiful face.

85mm @ F/1.8
Can't you just go shoot someone else?!
At least Journey didn't immediately get up and come lick the lens, at least not till after I took this shot.  With such a tight DOF, I think I like the lack of background clutter better here.

50mm @ F/1.8
Why is that guy pointing that thing at me?
This shot was taken about 6 feet away, the furthest I could get Candy without removing the leash.  Try as I might I couldn't get her to look at me, she was too interested in the birds, kids and other distractions.  At least she finally sat still for a couple shots.  DOF falloff at 6' on the 50mm isn't as fast as the 85mm, and looks better to me, especially when there's a busy background.  Nice, clean separation without looking like I pasted her into the scene.

50mm @F/1.8
Take this profile, it's my best side!
 Another advantage of the 50mm, I can still get a nicely focused head shot when my model comes in for a kiss and a hug and sits down on, not at, my feet.  Lean back just a little and voila - great head shot of Candy!

And just cause I feel like it, a couple more of my favorite shots from this experiment:

85mm @F/1.8
I think I smell a Puddy Tat!
This close with the 85mm and Journey almost looks like he's been pasted into the picture. But with the exception of a little exposure, vibrance and saturation tweaks, this is straight out of the camera.

85mm @F/1.8
Grass is always greener, ain't it da truth...
Candy's mission in life seems to be finding out how much a nylon leash can stretch.  Like Skittles, Candy is very interested in her surroundings. Going for walks is an adventure keeping her focused on her job. Which is also in contention. She thinks she's in charge...  (grin!)

Hope you enjoyed...


My Puddies my Puddies my Puddies!!!

My wonderful, lovely Pack buddies are back with me!

It's been so awesome having them back with me, and I'm back to shooting my favorite subjects as my medical issues ease up.  The following images are what I call practice, as I didn't bother to clean up the background or anything.  The light in the room was really great, and I wanted to get some more practice at extremely narrow depth of field, so I pulled out my 50mm F/1.2 lens and got down on the ground with them to play.

Needless to say, it took a couple Vicodin tablets to recover afterwards.  So, just say hi and try not to be too disappointed in the actual photography...  (grin!)

Your bone?  Yeah, right!
Think you're close enough dere Butch?
I remember this ball!
Can't a guy have a little privacy?

Hope you enjoy...

Oh Snap! It's all about energy

I know, it's been awhile since I've posted to my blog.  I've been dealing with some medical issues that have kept me inactive lately.  I have, however managed to get out with my camera recently, and have captured a few things you might find interesting.

Those new to my blog aren't aware that I have 2 passions: photography and animals, especially dogs.  For the last few years I've been studying dog behavior and dog training.  And one of the first things you learn is that in the dog world, size isn't as important as energy.  You've probably heard about "alpha" dogs, but have you ever seen anything like this???

Hey, I'm talking to you - you need a reminder who's in charge?!

When I say "JUMP!", you say...


How High?!

Angle to the sun wasn't the best, nonetheless the relationship between these three is interesting.  Three???  Whatever are you talking about John?  Oh, you didn't notice the other little one rolling on her back in the first shot?  The entire time I was hanging out shooting these guys, she was just a happy little girl, relaxing and watching the 2 drama queens...

Gotta love energy!

Hope you enjoyed...

Oh Snap! Family Pets

I'm working on my speedlight skills, and wanted a challenge: shooting black subjects.  Black can be very challenging to shoot properly. You have to over-expose areas so you can show form and texture while maintaining the sense that the subject is black and not gray.  But shooting black subjects in itself brings a challenge - how do you light them without blowing out the lighter surrounding?  And if that isn't enough, let's try shooting something that can't be counted on to sit still....

My friend Carol has 2 cats, Pancho and Elvis.  Pancho is pure black, and Elvis is black with white face, chest paws, etc. - an interesting challenge, and lighting is only one of them.  These are the first cats I've shot that were free to wander.  Well, until Carol caught them and brought them back. 

For the shoot I brought along some small softboxes and a couple 43" umbrellas.  Cats don't much like umbrellas, and they weren't too thrilled with the softboxes either.  These strange objects in the house that kept popping light in their face wasn't thrilling the cats too much, but they handled it better than I'd anticipated.  Mostly they ignored me by being cats.  Turning away and acting like we (me and my stuff) weren't there.  As such they didn't relax and play as much as we'd hope, but I still got a few good shots that I liked.


Here's a few for your viewing pleasure:

That's MY floor, buddy!

Just another day by the lake
The cats have their very own window, with a cushioned perch set up so they can relax and watch the world go by.

HEY!  Donchu see the "Do Not Disturb" sign?!


In this shot I deliberately underexposed the cats till they were almost a silhouette.  I set one speedlight with a Lumiquest SBIII softbox at camera left to bring out just a touch of their fur.  It was a happy accident that Pancho turned to look at Carol.  I was just after some profile shots, but when he turned, I had to take the shot.  The speedlight put just enough light on his face and whiskers to bring out the details without making it obvious that a light was there.  The only clue - the catchlight in his eyes.

You can see the full set on my flickr site...

Hope you enjoy....

Just How Many Rules ARE There?!

This time I'm only considering one rule - subject placement.  More specifically, where do you place your subject when they're not looking right at you?  The basic rule is to place them so there's more space where they're looking than there is behind them.  So, if they're looking off to the right, place them in the left portion of the image.  This also applies to shooting motion - if they're moving left-to-right, place them on the left portion, and vice-versa.

Ok, I lied - this is about the one situation where they're looking niether left or right and are in motion - right straight at you!

There's John!  He's got TREATS!!!

So, if they're coming straight at you, and looking right at you, place them in the center?  I find that placing them just off center makes the image more pleasing.

Use the force! Usetheforce Usetheforce TheforceUsing - wait....

To be even more specific, when the subject is leaning, the image felt better when I matched the offset to with their body lean.  In other words, if they were leaning right I placed them right of center...

Mumphmphmumph (translation: Mine MINE MINE!!!)

And if they were leaning to the left I placed them just left of center.  As a matter of fact, their side opposite the lean is pretty much lined up with the center.

You got another one for me??  Where's mine?! Where-where?!?!
Then there's the dilemma where one's coming right at you and the other is turning away.  I decided to give Journey someplace to go and add to Skittles' intensity by keeping the image off-balance.

I do feel the need to point out that Skittles loves to run.  She goes all out when she does, and can look quite intense as you can see in this series.  However, despite her rather fierce look, she's just a happy, excited dog.  Once she manages to apply the brakes and slow down that intense look is immediately gone.  She's quite fun to watch!

Don't know about you, but I like these images!

Hope you enjoy...

Obeying the Rules

My last post dealt with what we think about when we're shooting.  What do we internalize so it happens automatically, and what rules we consider when setting up a shot.  During my walk with the dogs I'd shot some birds and noticed, after the fact,  what rules I thought about and which I didn't.

A couple years ago I was pulled over and ticketed for not using my turn signals.  Now, I argued (with myself of course) that since no cars where around I didn't need to signal my intent.  Why do you have to signal when there's no traffic for heaven's sake?!

But in the days that followed I had to admit that I'd gotten lazy and out of the habit of using them except in certain tight situations.  And I found myself using them consistent from that point on.  2 years later I'm still a good boy, using my turn signals all the time.  Well, there is the rare time when no one's around... ... ... ;)

So, during today's walk I did some more bird shots - the day was warm and the sky mostly covered with high clouds.  I found myself thinking about all the rules I'd either ignored last time and it effected my shooting greatly.  I'm happier with this session, and I choose to believe it has something to do with being deliberate.  Internalizing some things (like checking your camera settings before each session) makes sense, but when it's time to shoot I realize that I want to do it consciously.  The experience was richer, more fulfilling.  My success rate was higher, my total image count was lower and I only had to throw a couple out for bad framing (hate when I cut off their tails).

Last time I took my 7D with a 24-105mm F/4-5.6 lens.  The combination wasn't the best choice for shooting birds cause you just can't get close enough without them flying away.  I had to do some serious cropping to get the images I shared.  This time I attached my 70-200 F/2.8 and the results were significantly better.  I still had to get closer than some birds liked, but those I shot required very little cropping, which gave me nicer closeups.

So, here's the results of raising my consciousness:

To self: Push the rule of thirds here to keep the main trunk from overpowering the birds

To Self: Step up the incline so the branch doesn't cut through his head

To Self: Next time you're shooting movable objects, set follow-focus and
burst mode and you won't have to rely so much on luck!!

To Self: Breaking the horizontal rule of thirds can work sometimes
and one "Atta Boy" for creative use of negative space

To Self:  Anticipate the grab so you catch him with his mouth open

To Self:  Ah... forget it - you already talk to yourself too much anyway!


The last 3 images were deliberately overexposed.  Sometimes a white  sky background can create an interesting effect, especially if you push it just a little.  I really like these last 3 - I can't tell you why, but I really do.  The negative space adds to the feel as well.  Moving the bird to the right of the frame just made it feel too busy.  Maybe that was because all the earlier shots were, and I'd grown tired of the look.  Not sure why, but it was a conscious decision to frame it as I did.


OH!  While I'm thinking about it - if you're going to shoot movable objects, try shooting them actually doing something.  You'll notice the conspicuous lack of berries in the 1st image, and a certain sedentary feel to the bird.  After shooting him I noticed the tree with the berries had more birds, then realized they were eating the old, dried berries.  In the remaining shots  the birds were either in the act of choosing a berry or grabbing one.  In the 2nd image, even though the bird was sitting, he still seems to be active, searching for a berry to grab.  And the remaining all have energy and intent as well.  It's much better to shoot that!


Hope you enjoyed...

A Bird in hand - or is that the bush?

Recently I had a brief chat with a friend of mine regarding what goes through your mind (or more importantly what doesn't) when you're trying to get a great shot and are feeling rushed.  How easy it can be to overlook depth of field or how the background interacts with the point of interest. Is the sky blown out or the shadows losing details, and on and on and on.

It got me to thinking about all the "rules" I've learned.  The one's I've internalized and the ones I'm still combating.  More importantly, it got me to thinking about how I shoot - do I consider the rules when I'm framing my shots, what factors do I consider?  And the answer came back - not many.

I looked back through my history of images, remembering the frustrating times when I'd beat myself up for not remembering the simple things:  ISO is a variable too, don't cut off their head or feet or crop at their joints, and on and on.  And I thought about what I do now...

So, today my dogs and I went for our walk and I took my camera to shoot some birds.  My friend told me there were these robins hanging out in some trees, and they'd let you get pretty close. Too close and they'd fly from tree to tree, but they'd never leave.

True enough, that's what they did.  Although the getting close part wasn't working so well for me.  At least, not with birds in the lower branches.  Might have something to do with the dogs not sitting still.

As I prepped for this post, I thought about what went through my mind as I made my images:  I considerwd exposure, letting the cloudy sky blow out a bit so the birds were properly exposed.  I considered where to position myself to eliminate branches between us as much as possible, and I considered the rule or thirds (sometimes).  Oh, and I'd decided before I even got there that I was going to minimize depth of field to keep the attention on the birds.

As I reviewed and processed the images,  I was reminded of those rules I hadn't thought of.  What I like to call the lucky accidents ( I seem to have a lot of them).

Rules like:

Don't position subjects so things are growing out of their head, neck, etc.
This little guy looks like he has a bit of a mohawk but it's a nub on the branch behind him.. And since he's so close to it his head is blending in with that branch.  This is an example of "go back and do it again!".

When your subject is looking to the side, compose more space in front of him than behind
The idea is to keep your eye from being drawn out of the picture.  Now, I didn't consider this rule till I was cropping it on my computer, and I can't tell you why I put the little fellow right in the middle (which also breaks the rule of thirds, by the way) when I did, except to say it felt right.

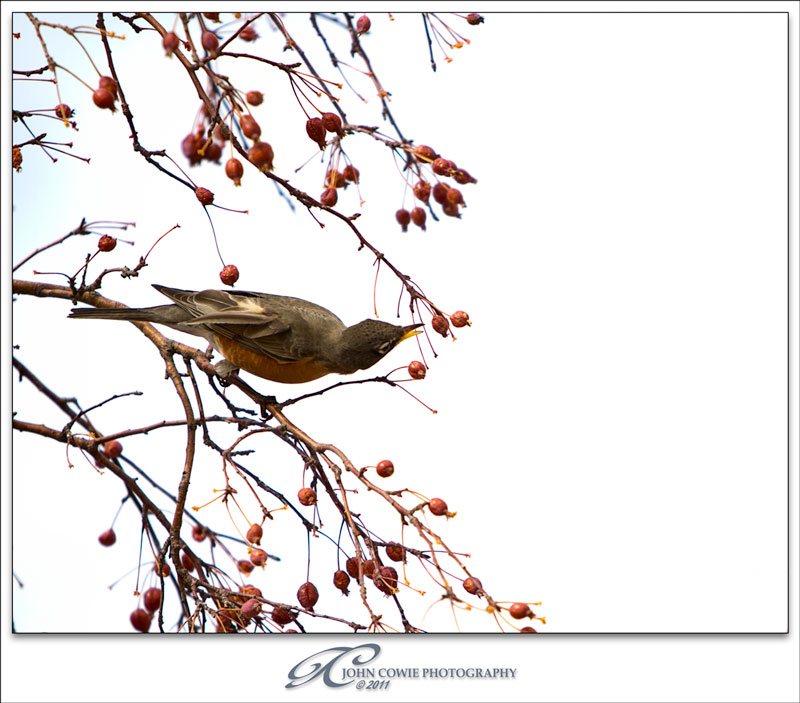
Rule of thirds, and avoiding things that dissect your subject
Seems I broke this one more than once.  But here again, this crop felt right to me during post processing.  And in my defense, I'd taken a step to get closer and the fellow turned slightly away. I quick-snapped this shot before he flew off.  And sure enough, just after I pressed the shutter he did.

As to the branch passing through his head, while not the optimum picture, it's better than the first one because his head is separated from the branch and easily identifiable.  Would I have taken the picture if I'd thought about this rule?  Most likely not.  The second image above it is indeed much better.  But if you do break it, at least make sure they don't merge as they did in the first one.

Keep your foreground and background simple.
Now, really - how can I declutter a tree???  Here, this was an artistic decision I made to have the bird play a little "Peek a boo". And with the narrow depth of field blurring the branches surrounding him your eye is naturally drawn right to him.  AND I obeyed the rule of thirds.

Avoid busy surroundings
Same rule as above, different way to think about it.  But here again, I think it works.  With the majority of the branches in soft focus your eye is drawn to the bird. The larger branches bring you in from the sides and lead you right to him (no, I'm not a male chauvinist - he might be a she but I ain't looking up his skirt to find out).

Lines and objects dissecting your subject.

This shot appeals to me in that the bird is popping out from his surroundings despite all the clutter.  This is one of those times I think breaking the rule works.  As does the one above it.  Somehow the clutter works in these shots.  At least, it does for me.

So, how big a deal is it to consider all the variables when you're shooting?  Depends on what your shooting and why, doesn't it?  If your doing a paid gig and the client is looking for something very specific then you'd best make absolutely sure you're taking everything into consideration.  Even if you're rushed.  And you will be, you can count on that.

If you're out on vacation, or just walking about or even setting up a shoot to capture something you've been thinking about, it's not the end of the world if you forget something.  Chances are you can try again at a later date.  But these are the perfect time to practice and hone your technique. Just don't beat yourself up - you're on vacation, remember?!

Digital cameras have been a god-send when playing and practicing.  The instant feedback lets you look at your crop, your depth of field, background clutter, etc.  It affords us the opportunity to fix the little things we tend to forget.

And as I considered what I was going to write on this blog it occurred to me that this instant feedback has been the method that has helped me internalize those key rules that are most important to me.  Things I used to agonize over while shooting I now do as naturally as breathing.

Some things that I've internalized, strangely enough, include conscious thought - what camera settings do I want to use, where should I set my white balance, is there anything in the frame that takes attention away from my subject? what's lying along the edges of my frame?  It's like an internal checklist that automatically runs when I pick up my camera.

Repetition builds habit, and done right, these kind of habits can make all the difference in the world.

Hope you enjoyed...

Oh Snap! Tabletop Car shot

It's pick your favorite night!


Each one evokes a different reaction for me.  I like them both for different reasons.  How about you?

The setup:


Another single light source setup (hey, we covered the whole two lights, one source thing last time so let it go, ok?!).  I flipped the table (from the last shoot) on it's side, shined the same two light cans into it and strategically placed black foam cards and paper to create the light patterns I wanted.

Simple setup, but precision is essential.  The small card directly behind the car, for example: too tall and it blocks light on the center of the car.  Too low and you get too much on the roof and start picking up lens flare.  Too wide and not enough light hits the "ground" - too narrow and you get rim lights on the edges.

The 2 tall cards have to block the light completely off the car and table surface.  Well, off the part of the table that will end up in the picture.  Lastly, the paper you see on top eliminates unwanted reflection from the windshield.

I wanted to reproduce this concept, but obviously on a much smaller scale.  I also wanted to try it with constant lights instead of flash.  This last proved to be a bit of a problem - those 2 20W light bulbs can't put enough light out to create the intensity I got from the Lego shoot.  I shot this at night, with all the lights in the house turned off and still couldn't create the intensity I was after.

Yes, yes - with constant light sources I can drag the shutter to bring up it's intensity. But the ambient hitting the black cards and the car come up too.  Despite the 8' tall black v-flats I placed around the back side of the table, the ceiling and walls in front of them bounce enough light back.  The only other choice is to bring in more light behind the white fabric.  Trouble is, there simply wasn't room for more lights back there - the set was just too small!

All that aside, even though I didn't achieve the effect I was after I still really like these shots. They are probably in that "love em or hate em" category.

Well, I love em, hope you do too!

Hope you enjoyed...

My First Car Shoot

 Recognize this beauty???

Not enough information to identify this sweet little car?  How about this?

Still not enough?  Then how about this...


No?  Well, that's the best shot I have, so I guess I'll just have to tell you.  It's the 2005 Ford GT.  A race/sports car with a rich history.  And she's my pride and joy.  Well, not next to my BMW Z4 cause, you see... um....  I don't fit in the Ford.

Purchased at Walmart for $5, I've been having some fun with tabletop photography.  Thought I'd share the results, and some behind the scenes info on how I did it.

The 1st 2 shots were made with this setup:


I wanted to play with constant light sources (a fancy way of saying "I'm using light bulbs") for a change. Unlike flash units, they let you see where the light is going before you take a shot. I also wanted to play with a single light source, so I started with a 12" square DIY (Do It Yourself) soft box with a 20W CFL bulb in a rigged up housing.

The soft box is suspended over a black mirror (sheet of glass painted black the bottom side), which provides that awesome reflection.

To get the first shot I shifted the soft box till the edge facing the camera was just over the car. I then taped on a piece of black foam card so that only about 2" of the front section of the soft box was providing light.  For the 2nd shot I removed the card, shifted things so the car was centered under the light, then added white paper "tents" to bring in details on the front edge and tail.  You've got to watch where you place the tents, however. Bring them too far forward (toward the camera) and they'll reflect light onto the side of the car, ruining the effect.

For the last shot things got a bit more complex.  My goal was to recreate the look and feel of a full-sized car shoot while sticking to the single light source theme:


Ok, ok, as you've not doubt noticed there ARE 2 lights up top, but that's only cause I didn't have a single light bulb with enough power to do the job.  So, I arranged them so they lit the nylon rip-stop fabric evenly across it's entire length, creating one single light source.  Wouldn't you agree???   (ahem)

Ok, so - I stretched white nylon rip-stop fabric across a PVC pipe frame I'd built some time ago, then strategically placed black foam cards on top to create interesting light/shadow patterns on the surface of the car.  The most important effect to accomplish is the reflection in the windshield.  Placing the black cards to light the top of the card took only a couple minutes.

The sticky part comes when trying to redirect the overhead light source onto the sides and front of the car. This is where tabletop photography gets fun - I cut custom sized pieces of stiff chrome paper, folded them into tents and placed them around the car to get the lighting effects I wanted.  This worked great for everything but the grill and tail.

For the tail, I added a large tent of white A4 paper for a larger, softer look.  The front grill was the problem - I couldn't get enough light from the fabric above to light the grill properly.  Easily solved though - there's a lot of spare light around to play with.

Those Home Depot reflectors don't point all the light down into the fabric.  Some light leaks out to the sides above the fabric/frame combination.  I placed a 12" square mirror tile in a clamp (just visible on the left side of the setup pic) and aimed it to pick up this stray light and send it toward the car.  In the right side of the setup shot, the mirror tent behind the right-front corner of the car bounces this light back onto the grill and corner.  A nice side effect of the large mirror is that it also brought up the light on the wheels and the white stripe running down the side.

So, who needs fancy, expensive gear to create a great car shot???  Grant you, things would have been a bit more dicey if the car was life-sized....

OH - before I forget: that little black dot on top of the fabric?  It's placed there to block most of the light from hitting the "Ford" emblem on the nose of the car.  There was too much glare bouncing into the camera  that you can't read it without the little dot.

(grin!) Hope you enjoyed.